
Reverb Tips with Valhalla VintageVerb: Modes, Predelay, Color and the Famous Presets
Valhalla VintageVerb is the budget reverb that lives on professional records. Learn how its reverb modes, three Color eras, and the all-important Predelay control work together, plus the famous presets that producers reach for again and again.
Few plugins are as loved or as widely used as Valhalla VintageVerb. It is cheap, light on the CPU, and capable of everything from a tight, invisible room to a vast, modulated ambient wash. It emulates the character of classic digital hardware reverbs from the 1970s and 1980s, with the slightly imperfect, colorful sound that defined the records of those eras, while also offering a clean modern setting for transparent work.
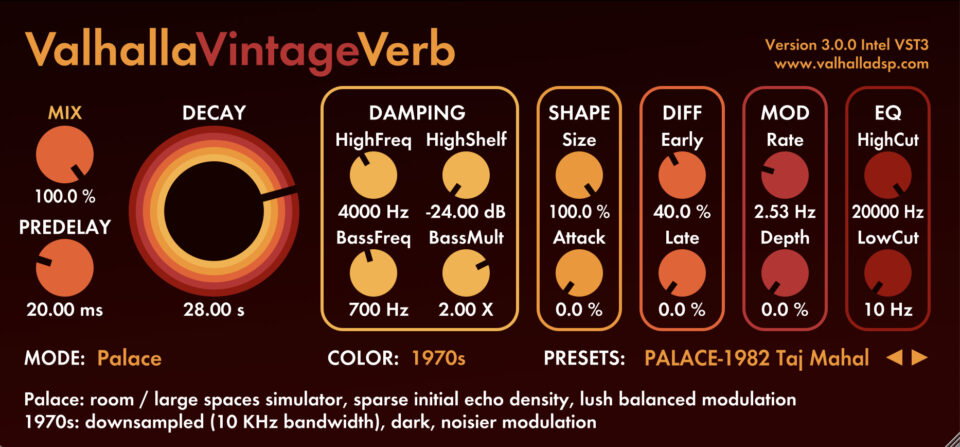
VintageVerb gives you a big bank of reverb algorithms, three switchable Color modes that change the era and character of the sound, and a deep set of controls including Mix, Predelay, Decay, Size, and tone shaping with high and low EQ. For all that depth it stays easy to use, which is why it turns up on so many professional mixes.
Reverb Modes: Choosing the Space
The Mode selector chooses the underlying reverb algorithm, which sets the basic type of space. The list covers halls, chambers, plates, rooms, and a set of more unusual creative spaces. Each mode has its own density and decay behavior, so picking the right one is your first and most important decision.
- Concert Hall and Bright Hall: large, lush spaces for orchestral instruments, pads, and big vocal tails. Bright Hall keeps more high-frequency energy for shimmer.
- Plate: the classic studio reverb sound, dense and smooth from the start. Default choice for vocals, snares, and a vintage pop sheen.
- Room and Chamber: smaller, contained spaces that add a sense of place without a long obvious tail. Ideal for gluing drums or adding realism to dry instruments.
- Ambience: a short, early-reflection-focused space for subtle depth on close-miked sources.
- Random Space, Chorus Space, and the Chaotic modes: heavily modulated, evolving textures for ambient, cinematic, and creative sound design where a static tail would feel sterile.
- Nonlin: a gated, non-linear decay that recalls 1980s gated drum reverbs.
Color: The Three Eras
The Color control switches the whole reverb engine between three voicings that emulate different generations of digital reverb hardware. The same mode and settings will sound noticeably different depending on which era you choose.
The 1970s setting is noisier, darker, and less hi-fi, with a grainy character that adds vintage warmth and grit. The 1980s setting keeps rich internal modulation but is brighter and cleaner, the sound of the classic digital reverbs behind gated-snare, big-vocal productions of that decade. The Now setting is the cleanest and most transparent, a colorless modern reverb that gets out of the way.
Predelay: The Most Important Control You Are Ignoring
Predelay is the gap of time between the dry sound and the start of the reverb tail, measured in milliseconds. It is arguably the single most useful control for making a reverb sit well in a mix, and beginners almost always leave it at zero.
A predelay of zero to 10 ms glues the reverb tightly to the source, which can muddy a vocal or smear a transient. Push it up to 20–80 ms and you separate the dry sound from the reverb, so the listener hears the clear dry attack first and the reverb arrives just after. That keeps a vocal intelligible and present even with a long, lush tail. On drums, a predelay timed to the tempo makes the reverb feel rhythmic rather than washy.
Predelay around 30–50 ms. You get size and richness without losing clarity, and the vocal stays forward rather than drowning in its own tail.Decay, Size, and Tone Shaping
Decay sets how long the tail lasts; Size scales the dimensions of the simulated space. The two interact: large Size with short Decay sounds like a big treated room, while small Size with long Decay creates a dense, unnatural but musical sustain. For most mix work, shorter decays that finish before the next phrase keep things clear. Ambient and cinematic work benefits from long, overlapping tails.
VintageVerb includes high and low frequency damping and EQ to shape the tone of the tail. Rolling off the highs makes the reverb sound darker and further away, helping it sit behind the dry source. Cutting the lows of the reverb keeps the tail from muddying the low end of the mix. The Mix control sets the wet/dry balance on an insert; many engineers prefer to run VintageVerb on a dedicated send at 100% wet so several tracks can share one reverb space.
The Famous Presets and How to Use Them
VintageVerb ships with a large factory preset library, and a handful have become go-to starting points across the community. The plate and hall vocal presets deliver instant size on a lead with sensible Predelay already dialed in. The ambient and chorus-space presets are favorites for pads and guitars, adding lush, modulated depth. The room presets are widely used to glue drum buses and add a believable sense of space to programmed kits.
Treat every preset as a starting point, not a finished sound. Three quick moves turn any preset into a reverb tailored to your track:
- Set
Mixto taste for the right wet/dry balance. - Raise
Predelayuntil the dry source stays clear and intelligible. - Roll off the low end of the tail so it does not crowd the mix.
Frequently asked questions
What does the Color control actually change?
<code>Color</code> switches the whole reverb engine between three voicings emulating different eras of digital reverb hardware. The 1970s mode is darker, noisier, and grainier for vintage character; the 1980s mode is brighter with rich modulation, the sound of classic 80s productions; and the Now mode is the cleanest and most transparent. The same mode and settings will sound noticeably different depending on the era you choose.
How do I keep a vocal clear when using a long reverb?
Raise <code>Predelay</code> to roughly 30–50 ms. This separates the dry vocal from the start of the reverb tail so the listener hears clear words first and the reverb arrives just after. Combine that with rolling off the low frequencies of the tail and keeping the wet level modest, and you can use a large, lush plate or hall while the vocal stays present and intelligible.
Should I use VintageVerb as an insert or on a send?
A send is usually more flexible. Running VintageVerb on a dedicated aux send at 100% wet lets several tracks share one reverb space, which sounds cohesive and saves CPU, and you control the amount per track with the send level. Use it as an insert with the <code>Mix</code> control when you want a reverb dedicated to a single source, such as a special effect on one vocal line.
Which mode is best for drums?
For natural glue on a drum bus, <strong>Room</strong> or <strong>Chamber</strong> with a short decay adds a believable sense of space without a long tail. For the 1980s gated-snare sound, use <strong>Nonlin</strong>, which gives a gated, non-linear decay. For vintage character on the whole kit, try <strong>Plate</strong> in the 1970s Color. In every case, a short <code>Predelay</code> and a low-frequency roll-off on the tail keep the drums punchy rather than washy.
Recommended Related Products
Valhalla DSP Bundle
World-class reverb and delay plugins - VintageVerb, Room, Delay, Supermassive and more.